Making Of 'FAUP - Path to Knowledge'
制作圖書館走廊,作者:Jacinto Monteiro

Inspiration
This personal work was created specifically for the Evermotion competition 2011. The digital artist could choose any interior space that inspired him. The main aim was for it to be photoreal.
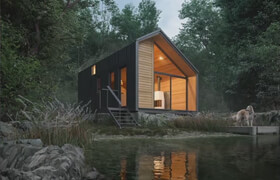
I chose the architecture university where I've been studying for six years. For a long time I wanted to create the path that goes from the street to the end of the building complex, which is the library itself. Because of time constraints I couldn't model everything so I focused on a short part of that same path.
Inspired by Michelangelo, the original architect Siza created a difficult path that leads you up ramps, down stairs and through almost labyrinth-like routes until you reach the end of the complex: the library. It is, in my opinion, the perfect place to read, mainly because the shadow is so soft and doesn't interfere with your reading. There is great geometry, fine details and a remarkable sense of scale in this space.
The goal of my work was to respect Siza's architectural concept, simplicity, materials, light and design, and obviously make it look hyper-realistic.
這件個人作品是專門為2011年Evermotion比賽創作的。數字藝術家可以選擇任何激發他靈感的室內空間。主要目的是讓它變得逼真。 我選擇了我學習了六年的建筑大學。很長一段時間以來,我想創造一條從街道到建筑群盡頭的路徑,也就是圖書館本身。由于時間限制,我無法對所有內容進行建模,因此我專注于同一路徑的一小部分。
受米開朗基羅的啟發,最初的建筑師西扎創造了一條艱難的道路,引導您上坡道,下樓梯,穿過幾乎迷宮般的路線,直到您到達建筑群的盡頭:圖書館。在我看來,這是閱讀的理想場所,主要是因為陰影非常柔和,不會干擾您的閱讀。這個空間有很好的幾何形狀、精細的細節和非凡的規模感。 我的工作目標是尊重Siza的建筑理念,簡單性,材料,光線和設計,并明顯使其看起來超現實。
Modeling
This part of the article covers the modeling of the museum space. For the floor, ramp and near wall I modeled simple boxes with the desired dimensions, around 1m x 50cm (Fig.01 - 02). Although it seems like the floor is one big object it is not. It's composed of different pieces (elements) separated by 5mm. This is very important because at the end of all this modeling I wanted to give each element a different ID - using the Unique Material plugin. Once the basic model was done, I applied a checker material with 2,0 tiling in order to know how well it was distributed after using the RailClone Pro plugin. In the end, I changed the checker material to a marble, which you will see in the texturing section.
本文的這一部分涵蓋了博物館空間的建模。對于地板、坡道和近墻,我用所需的尺寸(約 1m x 50 厘米)對簡單的盒子進行了建模(圖 01 - 02)。雖然地板似乎是一個大物體,但事實并非如此。它由由5毫米隔開的不同部分(元素)組成。這非常重要,因為在所有這些建模結束時,我想為每個元素提供不同的 ID - 使用獨特的材料插件。基本模型完成后,我應用了帶有 2,0 平鋪的檢查材料,以了解使用 RailClone Pro 插件后的分布情況。最后,我將棋盤格材質更改為大理石,您將在紋理部分看到。

Fig.01

Fig.02
I then created two splines, one for the floor and the other for the ramp. This determines their path when using the RailClone Pro plugin (Fig.03).
然后,我創建了兩條樣條曲線,一條用于地板,另一條用于坡道。這決定了它們在使用 RailClone Pro 插件時的路徑(圖 03)。

Fig.03
This is the final model after tweaking the parameters a bit in the RailClone settings. Everything else was set as default (Fig.04 - 05).
這是在 RailClone 設置中稍微調整參數后的最終模型。其他一切都設置為默認值(圖 04 - 05)。

Fig.4

Fig.5
After I had done this I converted the Railclone geometry into an editable poly object. Then, using the Unique Material ID free plugin, I gave the floor and ramp objects different IDs automatically. Each marble unit (element) had a different ID now. This made the marble material (multi-texture plugin) work perfectly once it was applied to the poly object.
完成此操作后,我將 Railclone 幾何體轉換為可編輯的多邊形對象。然后,使用唯一材料 ID 免費插件,我自動為地板和坡道對象提供了不同的 ID。現在,每個大理石單元(元素)都有不同的ID。這使得大理石材質(多紋理插件)在應用于多邊形對象后可以完美工作。
Texturing
Next I want to talk about the V-Ray dirt present on the edge of most of the wood materials. I will focus on the darker wood. Take a look at the detailing in Fig.06 - 07. As you can see, over the diffuse map there is a darker, thin edge with a few subtle differences on it. That is generated by V-Ray dirt with noise inside the diffuse channel. It's a little detail that can make the difference, especially in close-ups.
接下來我想談談大多數木材邊緣存在的 V-Ray 污垢。我將專注于較暗的木材。請看圖06 - 07中的細節。如您所見,在漫反射地圖上方有一個較暗的細邊緣,上面有一些細微的差異。這是由 V-Ray 污垢產生的,漫射通道內的噪聲。這是一個可以發揮作用的小細節,尤其是在特寫鏡頭中。

Fig.066

Fig.07
Fig.08 - 09 show the general settings for the wood material.
圖08 - 09顯示了木材的一般設置。

Fig.09

Fig.10
You will notice that the V-Ray dirt in the diffuse channel has a small radius, so that it does not go too far over the real wood diffuse. Also by ticking Invert Normal the parameter will change the direction of the raytracing. When it is off the rays are traced outside the surface; when on they are traced inside the surface. Basically it means that the dirt areas will appear on all the edges (if bias X, Y and Z are set to zero) (Fig.10 - 12).
您會注意到漫射通道中的 V-Ray 污垢半徑很小,因此它不會在實木漫射上走得太遠。同樣通過勾選反轉法線,該參數將改變光線追蹤的方向。當它關閉時,光線被追蹤到表面之外;當打開時,它們會在表面內部追蹤。基本上,這意味著污垢區域將出現在所有邊緣上(如果偏置 X、Y 和 Z 設置為零)(圖 10 - 12)。

Fig. 10

Fig.11

Fig.12
The un-occluded color is a normal diffuse map. In my work I always use color corrections and trigger the advanced settings, changing Gamma, Red, Green and Blue values and removing a bit of the saturation (in this case -30). It's never the same twice, as the material or scene is always different. I do all sorts of tests until all the materials blend together properly.
The noise inserted in the occluded color slot will make the edge behave in a random way. In this case, it was important to choose the colors inside the noise wisely so that they would blend well with the un-occluded color (diffuse map). This was so the edge didn't look too dark or too similar to the wood itself.
In some photos of the subject building I noticed that the marble on the floor had gained a slight green tint, probably due to humidity of some sort. I took that into account when texturing the floor. In Fig.13 you can see I used the famous multi-texture plugin in a subtle way.
未遮擋的顏色是法線漫反射貼圖。在我的工作中,我總是使用顏色校正并觸發高級設置,更改伽瑪,紅色,綠色和藍色值并刪除一點飽和度(在本例中為-30)。它永遠不會兩次相同,因為材料或場景總是不同的。我做各種各樣的測試,直到所有材料正確混合在一起。
插入遮擋顏色槽中的噪聲將使邊緣以隨機方式運行。在這種情況下,明智地選擇噪點內的顏色非常重要,這樣它們才能與未遮擋的顏色(漫反射貼圖)很好地融合在一起。這樣邊緣看起來就不會太暗或與木材本身太相似。
在主題建筑的一些照片中,我注意到地板上的大理石獲得了輕微的綠色色調,可能是由于某種濕度。我在為地板鋪紋理時考慮到了這一點。在圖例.13中,您可以看到我以一種微妙的方式使用了著名的多紋理插件。

Fig.13
Fig.14 shows the general settings of the V-Ray material. They are nothing too fancy. The diffuse channel is a composite with two types of map. Layer 1 is the aforementioned multi-texture, and layer 2 is the dirt map set to Multiply. The dirt map was painted in Photoshop (Fig.15).
圖例.14顯示了V-Ray材料的常規設置。它們沒什么太花哨的。漫反射通道是具有兩種類型貼圖的復合通道。第 1 層是前面提到的多紋理,第 2 層是設置為乘法的污垢貼圖。泥土地圖是在Photoshop中繪制的(圖15)。

Fig.14

Fig.15
Fig.16 shows the multi-texture settings that make up the first layer. I used about eight types of different marble maps for this multi-texture, which I acquired at CGSource.com.
圖例.16顯示了構成第一層的多紋理設置。我為這個多紋理使用了大約八種不同的大理石貼圖,這是我在 CGSource.com 時獲得的。

Fig.16
Layer 2 was the composite maps, the dirt map and its mask. I used the same map, but rotated it 90 degrees to add more dirt (Fig.17 - 19).
第 2 層是合成地圖、污垢地圖及其遮罩。我使用相同的地圖,但將其旋轉 90 度以添加更多污垢(圖 17 - 19)。

Fig.17

Fig.18

Fig.19
Light
The light system used was basically an HDRI inside a V-Ray Light Dome and a V-Ray Sun. The big difference here (or perhaps the little secret) is the skylight glass and what happens inside the structure. At first, I wanted to have only a V-Ray light dome, but the result didn't look very realistic. So I decided to boost the light inside the skylight and treat the glass as if it were being hit by bounces of light that would eventually pass to the interior.
Fig.20 shows the lights and how and where they were placed. There is a V-Ray light with a skylight portal in one of the windows, but it had zero effect on the scene and was just there for testing purposes; it isn't used in the final scene. A V-Ray light with an intensity of 10,0 was set to Visible and placed inside the skylight.
使用的照明系統基本上是V射線光穹頂和V射線太陽內的HDRI。這里最大的區別(或者可能是小秘密)是天窗玻璃和結構內部發生的事情。起初,我只想有一個V-Ray光穹,但結果看起來不是很逼真。所以我決定增強天窗內的光線,把玻璃當作被最終會傳遞到內部的光線反射擊中。
圖例.20顯示了燈光及其放置方式和位置。其中一個窗口中有一個帶有天窗門戶的 V-Ray 燈,但它對場景的影響為零,只是為了測試目的;它不會在最終場景中使用。強度為 10,0 的 V-Ray 燈設置為可見并放置在天窗內。

Fig.20
I wanted the frost glass to have a glossy look and at the same time a nice refraction so that it would be possible to see the metal structure inside of the skylight. The glass was made using a V-Ray blend material, which was a glossy glass combined with a V-Ray light material. It was set to an intensity of 100, the color was RBG (57, 95, 153) and the blend amount was a gray value equal to 5 (Fig.21 - 22).
我希望霜玻璃具有光澤的外觀,同時具有良好的折射率,以便可以看到天窗內部的金屬結構。玻璃是使用 V-Ray 混合材料制成的,這是一種與 V-Ray 光材料相結合的光澤玻璃。它被設置為100的強度,顏色為RBG(57,95,153),混合量為等于5的灰度值(圖21 - 22)。

Fig.21

Fig.22
Here are the frosted glass settings (Fig.23).
以下是磨砂玻璃設置(圖 23)。

Fig.23
Rendering
During the testing period I used universal settings, but I decided that I wanted to create an image over 3500 pixels high so universal settings were no longer an option. For the final images I used an irradiance map and light cache. I won't explain much about the settings except that I rendered the first images at a smaller resolution (four times lower that the final output; in my case it would be 875 x 619 pixels) and saved the irradiance map pre-passes (*.vrmap) plus the light cache map (*.vrlmap) to use afterwards for the final image. By using these maps you can skip the irradiance and light cache process and go straight to the render itself.
Take a look at the GI settings in Fig.24, which are the ones I used for the 875 x 619 render. In the irradiance map settings I set the Min and Max rate to -3 and 0 respectively. That meant a high quality irradiance map. If I had tried to render the final image with these settings it would have been impossible, but since I was rendering at a lower resolution I just saved the irradiance and light cache maps as it wouldn't take much longer to render than 1 hour on an 8 core computer. After the irradiance and light cache maps were calculated and saved I went back to the render settings and set the resolution to 3500 x 2625 pixels. Also, in the Mode section of the irradiance map settings, I changed Single Frame to a *.vrmap file and saved it. I also did that for the light cache file. For a good explanation of this process, check out the V-Ray Complete Guide written by Franscesco Legrenzi.
在測試期間,我使用了通用設置,但我決定要創建超過 3500 像素高的圖像,因此通用設置不再是一種選擇。對于最終圖像,我使用了輻照度圖和光緩存。我不會解釋太多關于設置的信息,除了我以較小的分辨率渲染了第一批圖像(比最終輸出低四倍;在我的例子中,它將是 875 x 619 像素)并保存輻照度圖預通道 (*.vrmap) 加上光緩存貼圖 (*.vrlmap) 以用于最終圖像。通過使用這些貼圖,您可以跳過輻照度和光線緩存過程,直接進入渲染本身。
看看圖 24 中的 GI 設置,這是我用于 875 x 619 渲染的設置。在輻照度圖設置中,我將最小和最大速率分別設置為 -3 和 0。這意味著高質量的輻照度圖。如果我嘗試使用這些設置渲染最終圖像,那是不可能的,但由于我以較低的分辨率渲染,我只是保存了輻照度和光緩存貼圖,因為在 8 核計算機上渲染不會超過 1 小時。計算并保存輻照度和光緩存貼圖后,我返回到渲染設置并將分辨率設置為 3500 x 2625 像素。此外,在輻照度圖設置的“模式”部分中,我將單幀更改為 *.vrmap 文件并保存。我也為輕量級緩存文件做了這件事。有關此過程的良好解釋,請查看由Franscesco Legrenzi撰寫的V-Ray完整指南。

Fig.24
Fig.25 shows the V-Ray render and color mapping settings.
圖 25 顯示了 V-Ray 渲染和顏色映射設置。
Post-production
Everything was done in Photoshop except the last part where I used After Effects Magic Bullet Misfire Vignette. You can see this in the free video you can download with this tutorial.
一切都是在Photoshop中完成的,除了我使用After Effects Magic Bullet Misfire Vignette的最后一部分。您可以在本教程下載的免費視頻中看到這一點。
Click here to download the movie associated with this tutorial

描述:
標簽: 翻譯 教程 圖文 圖書館分類:教程 > 3D教程 > 3Ds max
發布:CGer | 查看: | 發表時間:2012/7/19 7:58:13 | 更新時間:2025/4/4 23:13:16
○ 因利息系統長期被人利用漏洞刷取CG點,目前取消利息功能,作為補償,每個賬號額外一次性補償當前余額的 30% ,充值贈送百分比提高 100% (暫定),請知悉。 ○ 充值或賬號問題請【點擊這里聯系站長】 |
| 常見問題,點擊查詢: | ||
| ●CGer(Cg兒)資源下載幫助 | ||
| ●資源名詞解釋 | ||
| ●注冊/登陸問題 | ||
| ●充值出錯/修改密碼/忘記密碼 | ||
| ●充值贈送系統 | ||
| ●文件解壓出錯/解壓密碼 | ||
| ●Payment with Paypal | ||
| ●哪些資源會被列為付費資源 | ||
| ●為何要充值解鎖 | ||
| ●免責條款 | ||
| ●聯系站長(聯系站長前請先仔細閱讀 免責條款 ,網站只提供資源,不提供軟件安裝等服務!) | ||