Making Of 'Rosso'/制作'Rosso'
By Alfa Smyrna
作者:Alfa Smyrna
Software used/使用軟件:3ds Max
翻譯by:cger.com

Hello, in this Making Of, I will try to explain the pipeline for my scene
哈嘍大家好,這是個(gè)制作花絮,我用來將講解我的制作流程。
Rosso
Inspiration/靈感
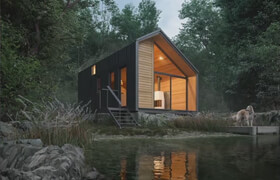
The idea for this scene began as a derivative of a former scene. I decided to make a study room where there are darker colors and wooden furniture. I wanted to create a realistic library bookshelf, with a study desk and some lounge chairs for resting or reading books.
這個(gè)場(chǎng)景的想法開始于一個(gè)之前的場(chǎng)景。我決定做一個(gè)書房,那里有深色的顏色和木制家具。我想要?jiǎng)?chuàng)造一個(gè)真實(shí)的圖書館書架,一個(gè)書桌究桌子和一可以休息和閱讀的椅子。
Reference Images/參考圖片
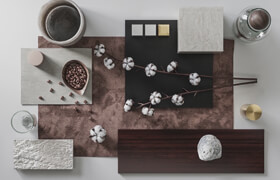
When starting a new scene, my first step is always searching for reference images. This is a vital step for me at the beginning of a project. I try to collect as many reference images as I can for the following:
每當(dāng)開始一個(gè)新場(chǎng)景,我的第一步總是尋找參考圖片。這是一個(gè)至關(guān)重要的一步我在項(xiàng)目的開始。我試圖收集盡可能多的參考圖片,我可以作為參考:
General concept and ambiance/主體概念和氛圍。
Different examples of the space I am creating/我創(chuàng)建的不同空間的樣本。
Objects I will be modeling/我要?jiǎng)?chuàng)建的物體。
Different materials and shaders I will be creating我要?jiǎng)?chuàng)建的各種材質(zhì)。
This step always inspires me with different ideas and enhances the details I have in my mind. In my experience it helps me to build a significantly better foundation for my scenes. Collecting reference images is highly-dependant on what you are planning to create and model and it is unique for every scene and concept (Fig.01).
這一步總是激勵(lì)著我腦海里產(chǎn)生不同的想法和細(xì)節(jié)。根據(jù)我的經(jīng)驗(yàn)為我的場(chǎng)景這會(huì)幫助我建立一個(gè)明顯更好的基礎(chǔ)。收集參考圖像高度依賴于你正打算創(chuàng)建什么樣的模型,它是獨(dú)一無二的,每一個(gè)場(chǎng)景的參考都是獨(dú)一無二的(圖1)。

Fig. 01
Units/單位
Setting the correct units for the scene is very important too. Whichever units you use, it is important to keep all the elements scaled and proportional to each other. Without correct scaling, individual elements (from models to light intensity and to textures) will not unite as expected. I use CM as my system units and display units (Fig.02).
設(shè)置正確的單位對(duì)場(chǎng)景非常重要。無論你使用哪種單位,重要的是要把所有的元素相互縮放和比例保持一致。沒有正確的比例,單個(gè)元素(從模型到光強(qiáng)度和紋理)就不會(huì)像預(yù)期一樣統(tǒng)一。我使用厘米作為我的系統(tǒng)單位和顯示單元(圖2)。

Fig. 02
Linear Workflow/線性流程
In 3ds Max, the default gamma space is 1. But our monitors are calibrated to gamma space 2.2. So we need to adjust our software and render engine to work in the same gamma space with our monitor and this is referred to as LWF (Linear Workflow ).This may sound a complicated thing to understand at the beginning, but in fact it is simple. In theory, it is just about adjusting the transition curve of midtones from black to white or, in other words, the transition of grays from black to white.
在3 dsMax,默認(rèn)的伽馬空間是1。但我們的監(jiān)視器校準(zhǔn)到的伽馬空間是2.2。所以我們需要調(diào)整我們的軟件和渲染引擎的工作在空間與我們的顯示器統(tǒng)一,這被稱為L(zhǎng)WF(線性工作流程)。這可能聽起來一個(gè)復(fù)雜的東西一開始不好理解,但事實(shí)上它很簡(jiǎn)單。在理論上,這只是關(guān)于調(diào)整過渡曲線的中間調(diào)從黑到白或者,換句話說,灰色的過渡從黑到白。
All of us are familiar with falloff maps and fresnel curves and we all adjust the falloff curves to create different effects or use the Curves tool to adjust the histogram of our images in different software. These are each different transition curves controlling different settings, parameters and the transition from white to black, or transition from yes to no. Just like this, LWF helps us adjust the gamma space, which actually controls the midtones curve in transition from black to white.
我們所有人都熟悉falloff貼圖和菲涅耳曲線,我們都調(diào)整fallof曲線來創(chuàng)建不同的效果或使用曲線工具來調(diào)整直方圖在不同的軟件。這些不同的過渡曲線控制不同的設(shè)置,參數(shù)和過渡從白到黑的,或者從是的沒有過渡到有。就像這樣,LWF幫助我們調(diào)整伽馬空間,這實(shí)際上控制著曲線在過渡從黑到白的中間調(diào)。
So now, we should Enable Gamma/LUT correction settings, as in the Fig.03.
所以現(xiàn)在,我們應(yīng)該使伽馬/ LUT校正設(shè)置,如圖03。

Fig. 03
I render to V-Ray Frame Buffer so I enabled the VFB and adjusted the color mapping settings as in Fig.04.
我要渲染到vray幀緩沖,所以我使用VFB并調(diào)整顏色映射設(shè)置如圖04。

Fig. 04
Modeling/模型
All the elements in the scene were modeled through basic poly modeling tools: connect, extrude, chamfer, move, weld etc., except the floor, ceiling and curtains (Fig.05).
場(chǎng)景中的所有元素都通過基本的多邊形建模工具建模:連接、擠壓、倒角、移動(dòng)、焊接等,除了地板、天花板和窗簾(圖5)。

Fig. 05
Floor/地板
The floor was modeled through a very useful plugin by CG-Source: The Floor Generator. It is a free plugin and you can download it from
地板是通過一個(gè)非常有用的插件建模來自于CG-Source:地板發(fā)生器。這是一個(gè)免費(fèi)的插件,您可以下載它
http://www.cg-source.com/floorgenerator.php
and watch the video tutorial about how to use. Actually it is very simple and easy to use. I also used another MultiTexture Map, which is another useful plugin from CG-Source. This plugin randomly assigns different bitmap textures based on Material ID or Object ID. The settings marked in red are important parameters to bring the variance and randomness (Fig.06). I repeated the same procedure for the ceiling wood.
你可以觀看視頻教程中關(guān)于如何使用,實(shí)際上它非常簡(jiǎn)單和容易使用。我還使用一個(gè)多重紋理地圖,這是另一個(gè)有用的插件也是來自于CG-Source。這個(gè)插件隨機(jī)分配不同的位圖紋理基于材料ID或?qū)ο驣D。設(shè)置中標(biāo)記為紅色是重要的參數(shù)可以獲得隨機(jī)效果(圖6)。我重復(fù)同樣的過程在天花板木材上。

Fig. 06
Curtain/窗簾
The curtain was modeled by simulating through the MaxCloth. There are in-depth step-by-step tutorials for MaxCloth inside 3ds Max Tutorials so I will not go into details. But here are the settings used for the simulation (Fig.07-09).
窗簾是通過MaxCloth模擬建模的。有深入的分步教程在3dsMax里面,所以我不會(huì)詳細(xì)敘述。但是這里有用于仿真的設(shè)置(fig07 - 09)。

Fig. 07

Fig. 08

Fig. 09
Books/書
All the books were modeled, textured one-by-one and placed manually. In fact, this was the most time-consuming modeling stage of the scene although. While it is a very simple task to model a book and texture a book, when there are many, each of them takes some time. And organizing the bookcase takes the longest time, as in real life! All the books were placed one by one and randomly so they look natural. And the funniest part of CG comes at the end: un-organizing what you have organized to make it look more realistic! But it was real fun to see my bookcase getting full with lots of books (Fig.10).
所有的書都是建模的,紋理逐一手動(dòng)放置的。事實(shí)上,這是最耗時(shí)的建模階段在這個(gè)場(chǎng)景。雖然這是一個(gè)非常簡(jiǎn)單的任務(wù)來建模一本書和紋理,但是當(dāng)有許多,他們每個(gè)都需要一些時(shí)間。和組織書柜花費(fèi)的時(shí)間最長(zhǎng),就像在真正的生活!所有的書都一個(gè)接一個(gè)地隨機(jī)地?cái)[放,所以他們看起來很自然。最有趣的CG部分出現(xiàn)在這里:用你的條理手法讓模型沒有條理,才能使它看起來更現(xiàn)實(shí)但這是真正的樂趣,看我的書柜變得充滿很多書(圖10)。

Fig. 10
Texturing/貼圖
Actually the shaders and materials in this scene are simple and basic as it is a clean interior, so it was enough only to introduce some age to the materials and keep away from dirt.
其實(shí)在這個(gè)場(chǎng)景著色及材質(zhì)是簡(jiǎn)單和基本的,因?yàn)樗且粋€(gè)干凈的室內(nèi),所以只要使用一些有年代的材質(zhì)質(zhì)感就夠了而不用什么污垢材質(zhì)了。
Wood Floor/木地板
As I mentioned explained above, the floor was modeled via the floor generator by CG-Source and I used the sister plugin MultiTexture, which is designed to go together with Floor Generator. After we check the necessary parameters as explained above, MultiTexture Map does the job and brings the randomness based on Object ID or Material ID (Fig.11).
正如我上面提到的解釋,地板是建模是通過地板生成器來自于CG-Source,我使用了姊妹插件MultiTexture,其目的是配合地板發(fā)生器。然后我們檢查如上所述的必要的參數(shù),MultiTexture基于對(duì)象ID或材質(zhì)ID增加了材質(zhì)的隨機(jī)性(圖11)。

Fig. 11
Reflection and ReflectionGlossiness maps were derived from adding a Color Correction map on Diffuse map and setting it monochrome to destaturate the map. I adjusted some parameters as you see in Fig.12.
反射和反射模糊貼圖來自在表面貼圖上添加一個(gè)顏色校正設(shè)置它為黑白色。我調(diào)整一些參數(shù)如你看到在圖12。
翻譯by:cger.com

Fig. 12
Books/書籍
Each book was textured individually with basic mapping techniques (Fig.13).
每本書都是用基本的貼圖技術(shù)一個(gè)一個(gè)貼出來的。

Fig. 13
Curtain/窗簾
The curtain shader is a Vray2Sided material to mimic the translucent look and imitate how light scatters inside the curtain. The Trace Reflections setting is disabled because there is no need for the exact raytrace reflections. There is a Falloff map in the refraction slot, which makes the curtain less transparent on the sides and more transparent on the front.
窗簾材質(zhì)是一個(gè)Vray2Sided材質(zhì)來模擬半透明的外觀和模仿光散射的效果。反射追蹤設(shè)置是關(guān)閉的,因?yàn)椴恍枰獪?zhǔn)確的光線追蹤反射。有一個(gè)falloff貼圖在折射槽里,使窗簾的兩邊不太透明兒正面更加透明。
The bitmap is for the stripe on the curtains. You can have a curtain with lace or leafs or anything.
窗簾條紋的貼圖,你可以用花邊窗簾或樹葉或任何東西。
The settings for the shader can be seen in Fig.14-17.
材質(zhì)的參數(shù)如圖14-17。

Fig. 14

Fig. 15

Fig. 16

Fig. 17
Lighting/燈光
Through the set of images, there are different light rigs and scenarios. I will try to explain how I made the lighting of the dawn time images (Fig.18).
通過參考一系列圖片,有不同的燈光效果和情境。我將試著解釋我是如何制作黎明的照明的(圖18)。

Fig. 18
In these hours of the day, sun rays come to us in a very wide angle, almost horizontal, so they create a very soft lighting and soft and long shadows. I used a VraySun and adjusted the amplitude (Z coordinate). I made the size slightly larger in order to create much softer shadows. There is a bitmap texture for the skylight (Fig.19-21).
在一天的這些時(shí)間里,太陽管線以一個(gè)很寬的角照射到這里,幾乎是水平的,所以他們創(chuàng)造一個(gè)非常柔和的燈光和模糊的長(zhǎng)長(zhǎng)的影子。我使用一個(gè)VraySun來調(diào)整幅度(Z坐標(biāo))。我把尺寸做的略大為了創(chuàng)建多軟陰影。用了一個(gè)位圖紋理在天光里(圖19 - 21)。

Fig. 19

Fig. 20

Fig. 21
In some detail shots, I used Direct Light instead of the VraySun just to have some more control on the color.
在一些細(xì)節(jié)照明上,我使用Direct Light而不是VraySun只是為了有一些更多的控制在顏色上。
Rendering/渲染
The scene was rendered with V-Ray 2.10.01 and you can see the settings in (Fig.22-25).
該場(chǎng)景是用V-Ray 2.10.01渲染的,你可以看到設(shè)置如圖(圖22 - 25)。

Fig. 22

Fig. 23

Fig. 24

Fig. 25
翻譯by:cger.com
As explained above, I rendered to VrayFrameBuffer and enabled Gamma Correction, which is known as Linear Workflow. One thing I would like to remind is that you can always disable the Don't Affect Colors-Adaptation Only button to bake the Gamma Correction into your final render without using the sRGB button.
如上所述,我渲染到VrayFrameBuffer,啟用伽馬校正,這就是所謂的線性工作流程。有一件事我想提醒是,你總是可以禁用Don't Affect Colors-Adaptation按鈕來烘焙伽馬校正進(jìn)你的最后的渲染而不使用sRGB按鈕。
I would also like to remind that render settings are specific to scenes and copying exact settings can cause either excessively high rendering times or poor quality in some scenes, so I would advise everyone to test some parameters in your own scenes and set your settings individually for each scene to have better quality and faster render times.
我也想提醒一點(diǎn),渲染設(shè)置是特定于場(chǎng)景的,直接復(fù)制設(shè)置可能導(dǎo)致要么參數(shù)過高或質(zhì)量變差差,所以我建議大家測(cè)試一些參數(shù)在你自己的場(chǎng)景,設(shè)置您的設(shè)置單獨(dú)為每個(gè)場(chǎng)景才會(huì)有更好的質(zhì)量,更快的渲染時(shí)間。
Post-production/后期
In Fig.26 you can see some of the adjustments I have on the raw render. These are very basic adjustments on the color and histogram of the image. I don't follow any preset or rule for this step. Every image has different meaning, ambiance, lighting, colors, balance and histogram so I believe it is best to treat every image as unique and let your eye guide you for this step without following any rule.
在圖26你可以看到一些我對(duì)原始的渲染的調(diào)整。這些都是很基本的調(diào)整顏色和圖像的直方圖。我不遵循任何預(yù)設(shè)或規(guī)則在這一步。每個(gè)圖像都有不同的意義,氣氛、照明、色彩、平衡和直方圖,所以我認(rèn)為這是最好的對(duì)待每一個(gè)圖像,讓你的眼睛引導(dǎo)你做這一步,沒有任何規(guī)則。

Fig. 26
Conclusion/結(jié)論
So these are the major steps of my workflow for the scene Rosso and I tried to explain my pipeline and cover the questions that have been asked on the forums. I hope you find it useful. I would like to thank everyone for commenting on my project, giving feedback to show me my mistakes and encouraging me for new scenes with great inspiration (Fig.27).
至此這些是我的工作流的主要步驟,我試圖解釋我的流程并解決在論壇上有人提出來的問題。我希望你覺得它有用。我非常感謝大家評(píng)論我的項(xiàng)目,給予反饋指出我的錯(cuò)誤,并鼓勵(lì)我新的靈感來創(chuàng)建新的場(chǎng)景(圖27)。

Fig. 27
翻譯by:cger.com
原文來源:http://www.3dtotal.com/index_tutorial_detailed.php?roPos=1&catDisplay=1&id=1442#.UDVxOKP9W-o
描述:
標(biāo)簽: max 翻譯 教程 圖文分類:教程 > 3D教程 > 3Ds max
發(fā)布:CGer | 查看: | 發(fā)表時(shí)間:2012/8/23 8:09:58 | 更新時(shí)間:2025/4/4 23:13:23
○ 因利息系統(tǒng)長(zhǎng)期被人利用漏洞刷取CG點(diǎn),目前取消利息功能,作為補(bǔ)償,每個(gè)賬號(hào)額外一次性補(bǔ)償當(dāng)前余額的 30% ,充值贈(zèng)送百分比提高 100% (暫定),請(qǐng)知悉。 ○ 充值或賬號(hào)問題請(qǐng)【點(diǎn)擊這里聯(lián)系站長(zhǎng)】 |
| 常見問題,點(diǎn)擊查詢: | ||
| ●CGer(Cg兒)資源下載幫助 | ||
| ●資源名詞解釋 | ||
| ●注冊(cè)/登陸問題 | ||
| ●充值出錯(cuò)/修改密碼/忘記密碼 | ||
| ●充值贈(zèng)送系統(tǒng) | ||
| ●文件解壓出錯(cuò)/解壓密碼 | ||
| ●Payment with Paypal | ||
| ●哪些資源會(huì)被列為付費(fèi)資源 | ||
| ●為何要充值解鎖 | ||
| ●免責(zé)條款 | ||
| ●聯(lián)系站長(zhǎng)(聯(lián)系站長(zhǎng)前請(qǐng)先仔細(xì)閱讀 免責(zé)條款 ,網(wǎng)站只提供資源,不提供軟件安裝等服務(wù)!) | ||